Grandmaobi (talk | contribs) (Added Baawool to available Pok*mon) Tags: Visual edit apiedit |
(→Pokémon: Removed Smaqua from the Fishing encounters table, since it's encountered via Surfing, and having it twice in the correct encounter method is redundant) Tag: Visual edit |
||
| (13 intermediate revisions by 8 users not shown) | |||
| Line 2: | Line 2: | ||
|type = Grass |
|type = Grass |
||
|name = Route 11 |
|name = Route 11 |
||
| − | |image = |
+ | |image = Route11.png |
|size = 256 |
|size = 256 |
||
| − | |mapdesc = |
+ | |mapdesc = The famous Haybarrel Ranch and a berry planting field make this route to a beautiful place. |
|region = Rikoto |
|region = Rikoto |
||
| − | | |
+ | |north = Coralite Town |
| − | |east = |
+ | |east = Route 12 |
|south = Wild Plains |
|south = Wild Plains |
||
| − | |north = Lake Bliss |
||
|map = Route11Location.png |
|map = Route11Location.png |
||
|mapsize = 256 |
|mapsize = 256 |
||
| Line 16: | Line 15: | ||
|prev = Route 10 |
|prev = Route 10 |
||
|next = Route 12}} |
|next = Route 12}} |
||
| − | '''Route 11''' is the eleventh route in [[Rikoto]]. It is connected to [[Coralite Town]] to the |
+ | '''Route 11''' is the eleventh route in [[Rikoto]]. It is connected to [[Coralite Town]] to the north, [[Route 12]] to the east to and [[Wild Plains]] to the south. |
==Route Description== |
==Route Description== |
||
Route 11 is a long farm like route where the famous Haybarrel Ranch is. |
Route 11 is a long farm like route where the famous Haybarrel Ranch is. |
||
| + | ==Ranch (2nd floor)== |
||
| + | {{shop|Start}} |
||
| + | {{shoprow|{{shopitem|Figy Berry|1000|PD|}}|{{shopitem|Wiki Berry|1000|PD|}}}} |
||
| + | {{shoprow|{{shopitem|Mago Berry|1000|PD|}}|{{shopitem|Aguav Berry|1000|PD|}}}} |
||
| + | {{shoprow|{{shopitem|Iapapa Berry|1000|PD|}}|}} |
||
| + | {{shopfooter}} |
||
| + | |||
| + | {{shop|Start}} |
||
| + | {{shoprow|{{shopitem|Growth Mulch|200|PD|}}|{{shopitem|Damp Mulch|200|PD|}}}} |
||
| + | {{shoprow|{{shopitem|Stable Mulch|200|PD|}}|{{shopitem|Gooey Mulch|200|PD|}}}} |
||
| + | {{shopfooter}} |
||
==Items== |
==Items== |
||
{{ItemListStart|land}} |
{{ItemListStart|land}} |
||
| − | {{ItemList| |
+ | {{ItemList|TM Normal|On the small island (Surf)|display=TM88 (Sleep Talk)}} |
| − | {{ItemList| |
+ | {{ItemList|Lum Berry|Across the pond next to the barn}} |
| + | {{ItemList|PP Up|Northeast corner of the fence (Cut)}} |
||
| + | {{ItemList|Berry Juice|From a farmer in the second floor of the ranch}} |
||
| + | {{ItemList|Razz Berry|Berry garden|display=Razz Berry (x2)}} |
||
| + | {{ItemList|Nanab Berry|Berry garden|display=Nanab Berry (x2)}} |
||
| + | {{ItemList|Bluk Berry|Berry garden|display=Bluk Berry (x2)}} |
||
| + | {{ItemList|Wepear Berry|Berry garden|display=Wepear Berry (x2)}} |
||
| + | {{ItemList|Pinap Berry|Berry garden|display=Pinap Berry (x2)}} |
||
| + | {{ItemList|Cornn Berry|Berry garden|display=Cornn Berry (x2)}} |
||
| + | {{ItemList|Magost Berry|Berry garden|display=Magost Berry (x2)}} |
||
| + | {{ItemList|Rabuta Berry|Berry garden|display=Rabuta Berry (x2)}} |
||
| + | {{ItemList|Nomel Berry|Berry garden|display=Nomel Berry (x2)}} |
||
| + | {{ItemList|Spelon Berry|Berry garden|display=Spelon Berry (x2)}} |
||
| + | {{ItemList|Watmel Berry|Berry garden|display=Watmel Berry (x2)}} |
||
| + | {{ItemList|Durin Berry|Berry garden|display=Durin Berry (x2)}} |
||
| + | {{ItemList|Belue Berry|Berry garden|display=Belue Berry (x2)}} |
||
| + | {{ItemList|Iron|In the left corner of the berry garden}} |
||
{{ItemListEnd|land}} |
{{ItemListEnd|land}} |
||
| + | ==Pokémon== |
||
| − | |||
| − | ==Pokemon== |
||
{{catch/header|land|no}} |
{{catch/header|land|no}} |
||
| − | {{catch/entry|Bullson|Bullson|Grass| |
+ | {{catch/entry|Bullson|Bullson|Grass|34-36|all=25%|type1=Normal}} |
| − | {{catch/entry| |
+ | {{catch/entry|Bushup|Bushup|Grass|33-35|all=10%|type1=Grass}} |
| − | {{catch/entry| |
+ | {{catch/entry|Psyflock|Psyflock|Grass|34-36|all=25%|type1=Psychic|type2=Flying}} |
| − | {{catch/entry|Wormune|Wormune|Grass| |
+ | {{catch/entry|Wormune|Wormune|Grass|34-36|all=20%|type1=Bug|type2=Ground}} |
| − | {{catch/entry|Horshush|Horshush|Grass| |
+ | {{catch/entry|Horshush|Horshush|Grass|34-36|all=20%|type1=Grass}} |
{{Catch/div|land|Headbutt}} |
{{Catch/div|land|Headbutt}} |
||
| − | {{catch/entry|Weashock|Weashock|Headbutt|33-35|all= |
+ | {{catch/entry|Weashock|Weashock|Headbutt|33-35|all=50%|type1=Electric}} |
| − | {{catch/entry| |
+ | {{catch/entry|Paraful|Paraful|Headbutt|33-35|all=30%|type1=Normal|type2=Flying}} |
| + | {{catch/entry|Aeroma|Aeroma|Headbutt|33-35|all=20%|type1=Grass|type2=Flying}} |
||
{{Catch/div|water|Surfing}} |
{{Catch/div|water|Surfing}} |
||
| − | {{catch/entry| |
+ | {{catch/entry|Angelish|Angelish|Surfing|33-35|all=60%|type1=Water}} |
| − | {{catch/entry| |
+ | {{catch/entry|Swellegant|Swellegant|Surfing|33-35|all=30%|type1=Water|type2=Flying}} |
| + | {{catch/entry|Smaqua|Smaqua|Surfing|33-35|all=10%|type1=Fighting|type2=Water}} |
||
{{Catch/div|water|Fishing}} |
{{Catch/div|water|Fishing}} |
||
| − | {{catch/entry|Angling|Angling|Fish Old|5- |
+ | {{catch/entry|Angling|Angling|Fish Old|5-15|all=100%|type1=Water}} |
| − | {{catch/entry| |
+ | {{catch/entry|Angelish|Angelish|Fish Good|25-30|all=60%|type1=Water}} |
| − | {{catch/entry| |
+ | {{catch/entry|Weedsea|Weedsea|Fish Good|20-25|all=20%|type1=Water|type2=Grass}} |
| − | {{catch/entry| |
+ | {{catch/entry|Aquad|Aquad|Fish Good|20-25|all=20%|type1=Fighting|type2=Water}} |
| − | {{catch/entry| |
+ | {{catch/entry|Angelight|Angelight|Fish Super|35-45|all=80%|type1=Water}} |
| − | {{catch/entry| |
+ | {{catch/entry|Kelpula|Kelpula|Fish Super|35-45|all=15%|type1=Water|type2=Grass}} |
{{Catch/div|road|Special}} |
{{Catch/div|road|Special}} |
||
{{catch/entry|Baawool|Baawool|Ranch|30|all=Only one|type1=Normal}} |
{{catch/entry|Baawool|Baawool|Ranch|30|all=Only one|type1=Normal}} |
||
| Line 51: | Line 78: | ||
==Trainers== |
==Trainers== |
||
{{Trainer/header|land}} |
{{Trainer/header|land}} |
||
| − | {{Trainer/entry|TrainerSolarGruntM.png|Team Solar|Grunt| |
+ | {{Trainer/entry|TrainerSolarGruntM.png|Team Solar|Grunt|1520|3|001|Cobolta|M|38|None|001|Deerash|M|38|None|001|Scorpinova|M|38|None}} |
| − | {{Trainer/div|land}} |
||
| − | {{Trainer/entry|TrainerCowgirl.png|Cowgirl|Irina|800|1|001|Horshush|F|38|None}} |
||
| − | {{Trainer/div|land}} |
||
| − | {{Trainer/entry|TrainerRancher.png|Rancher|Samuel|850|2|013|Baawool|M|37|None|030|Snuffuzz|M|37|None}} |
||
| − | {{Trainer/div|land}} |
||
| − | {{Trainer/entry|TrainerCowgirl.png|Cowgirl|Lassie|800|1|017|Bullson|F|38|None}} |
||
| − | {{Trainer/div|land}} |
||
| − | {{Trainer/entry|TrainerRancher.png|Rancher|Jacob|850|2|013|Baawool|M|37|None|030|Peaflock|M|37|None}} |
||
{{Trainer/footer|land}} |
{{Trainer/footer|land}} |
||
==Trivia== |
==Trivia== |
||
| + | *In Demo 4 and Demo 5, Route 11 was leading to Sailport Town and Lake Bliss. In the final version, Route 11 was separated to two Routes. |
||
| − | *splat tim the woomy. |
||
{{locations}} |
{{locations}} |
||
| + | [[Category:Routes]] |
||
Latest revision as of 22:33, 18 June 2020
| |||||||||||||||
| |||||||||||||||
Map description
| |||||||||||||||
Required for navigation
| |||||||||||||||
Connecting locations
| |||||||||||||||
Location Location of Route 11 in Rikoto. | |||||||||||||||
Routes in Rikoto
| |||||||||||||||
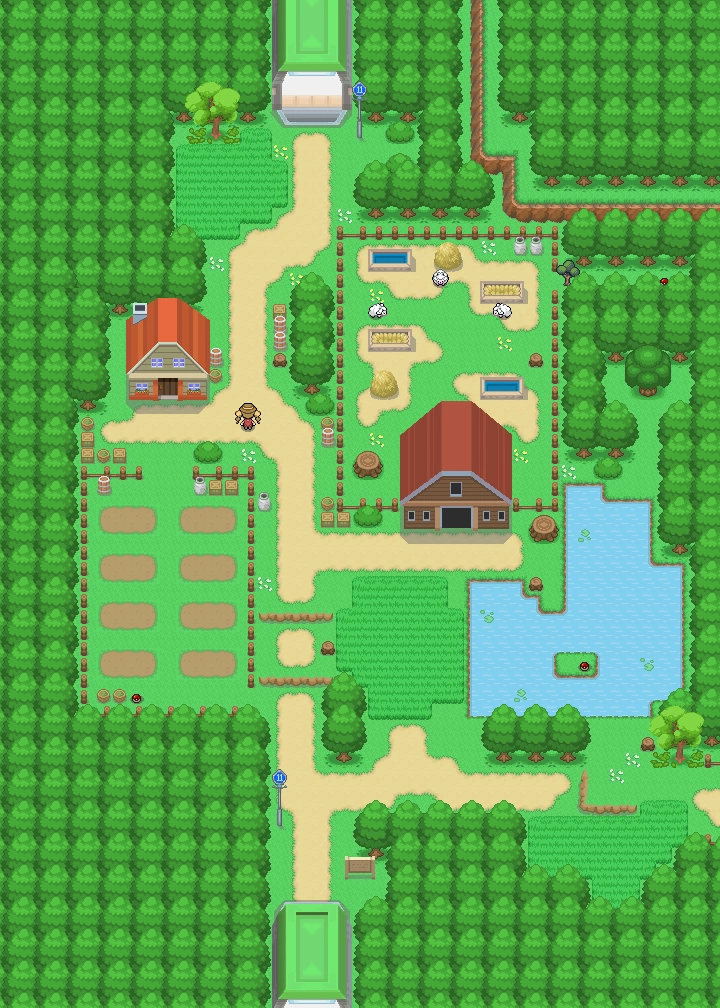

Route 11 is the eleventh route in Rikoto. It is connected to Coralite Town to the north, Route 12 to the east to and Wild Plains to the south.
Route Description
Route 11 is a long farm like route where the famous Haybarrel Ranch is.
Ranch (2nd floor)
| Start | |||||||
|---|---|---|---|---|---|---|---|
|
| ||||||
|
| ||||||
|
|||||||
| Start | |||||||
|---|---|---|---|---|---|---|---|
|
| ||||||
|
| ||||||
Items
| Item | Location | |
|---|---|---|
| TM88 (Sleep Talk) | On the small island (Surf) | |
| Lum Berry | Across the pond next to the barn | |
| PP Up | Northeast corner of the fence (Cut) | |
| Berry Juice | From a farmer in the second floor of the ranch | |
| Razz Berry (x2) | Berry garden | |
| Nanab Berry (x2) | Berry garden | |
| Bluk Berry (x2) | Berry garden | |
| Wepear Berry (x2) | Berry garden | |
| Pinap Berry (x2) | Berry garden | |
| Cornn Berry (x2) | Berry garden | |
| Magost Berry (x2) | Berry garden | |
| Rabuta Berry (x2) | Berry garden | |
| Nomel Berry (x2) | Berry garden | |
| Spelon Berry (x2) | Berry garden | |
| Watmel Berry (x2) | Berry garden | |
| Durin Berry (x2) | Berry garden | |
| Belue Berry (x2) | Berry garden | |
| Iron | In the left corner of the berry garden | |
Pokémon
| Pokémon | Location | Levels | Rate | |||||||||
|---|---|---|---|---|---|---|---|---|---|---|---|---|
|
|
34-36 | 25% | |||||||||
|
|
33-35 | 10% | |||||||||
|
|
34-36 | 25% | |||||||||
|
|
34-36 | 20% | |||||||||
|
|
34-36 | 20% | |||||||||
| Headbutt | ||||||||||||
|
|
33-35 | 50% | |||||||||
|
|
33-35 | 30% | |||||||||
|
|
33-35 | 20% | |||||||||
| Surfing | ||||||||||||
|
|
33-35 | 60% | |||||||||
|
|
33-35 | 30% | |||||||||
|
|
33-35 | 10% | |||||||||
| Fishing | ||||||||||||
|
|
5-15 | 100% | |||||||||
|
|
25-30 | 60% | |||||||||
|
|
20-25 | 20% | |||||||||
|
|
20-25 | 20% | |||||||||
|
|
35-45 | 80% | |||||||||
|
|
35-45 | 15% | |||||||||
| Special Pokémon | ||||||||||||
|
|
30 | Only one | |||||||||
Trainers
| Trainer | Pokémon | |||||||||||
|---|---|---|---|---|---|---|---|---|---|---|---|---|
|
| |||||||||||
| ||||||||||||
| ||||||||||||
| Trainers with a telephone symbol by their names will give their Pokégear number to the player, and may call or be called for a rematch with higher-level Pokémon. | ||||||||||||

Trivia
- In Demo 4 and Demo 5, Route 11 was leading to Sailport Town and Lake Bliss. In the final version, Route 11 was separated to two Routes.